![]()
Plan Tower Construction
![]()
Utility Tower 1-Wire Kit Sandbox
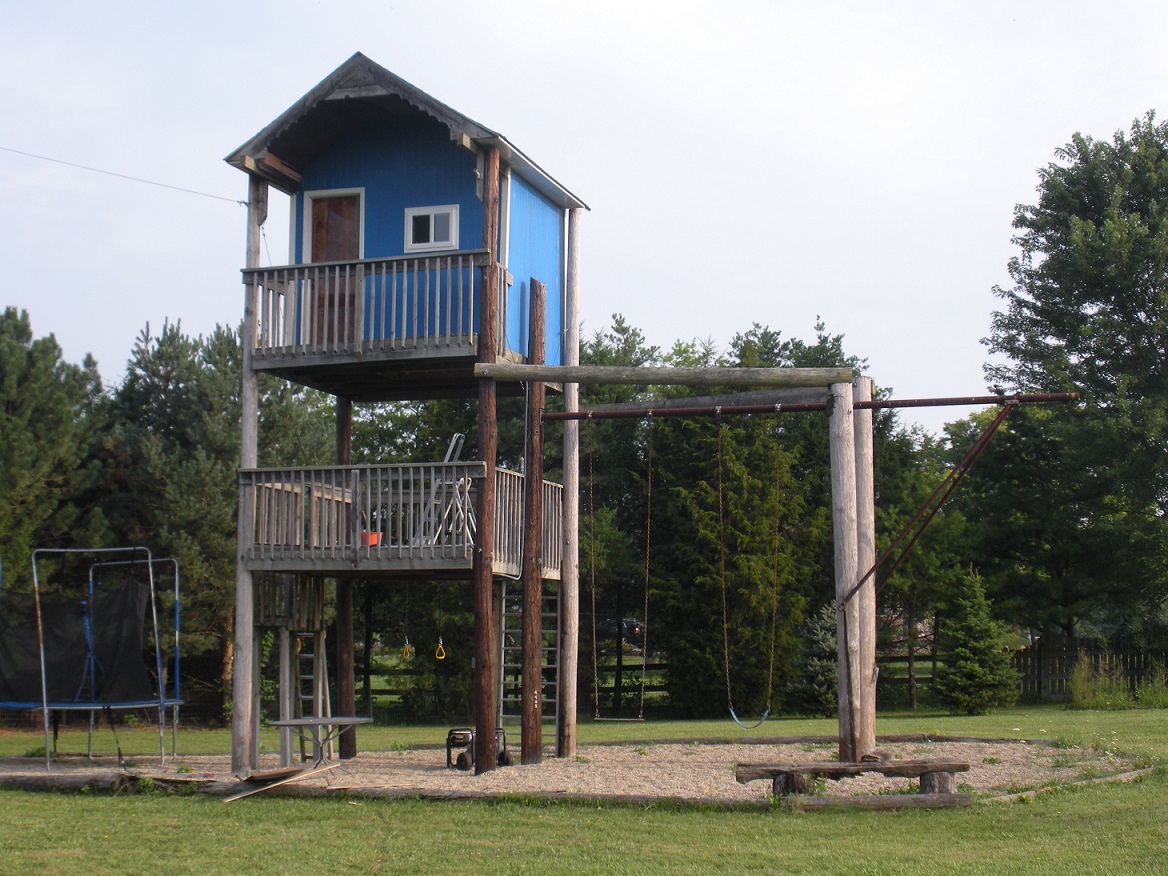
An admittedly ambitious effort to establish the most eccentric tower house/play ground area in the township, if not the county. Finally completed in 2001, renovated in 2012-2013.
The Great Ceramic Tile Installation
Being a pictorial overview of the installation of ceramic tile in the great room, kitchen, hall way, and bedroom.
Thumbnail images are used in order to speed download times for your convenience.
April 1999
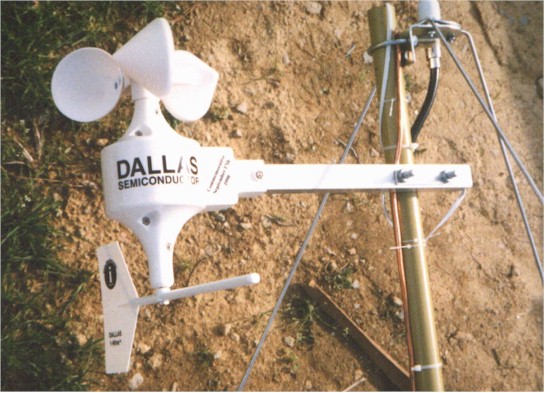
In the early spring of 1999, I purchased a 1-Wire Weather Station kit from Dallas Semiconductor for a paltry $79.00. This acquisition resulted in the need to procure a utility pole to provide adequate elevation. Since we also had a 300w floodlight (previously mounted on the peak of the barn), it only made sense to install this light on the pole as well. A call to a certain friendly utility company in the area resulted in an almost immediate delivery of no less than 3 40ft. poles to the property, nicely laid next to the drive way.
As I had no way of moving them, however, I called the same company for suggestions as to how to set them in the ground. I was happily informed that given the proper timing, the same company would come out and install them for free. This was quite a deal, obviously, and my mind went to work. Since I now had 3 poles, and only needed 1 for the utility effort, I quickly explored the possibility of acquiring a few more to be used to build a tree house of sorts.
July 1999
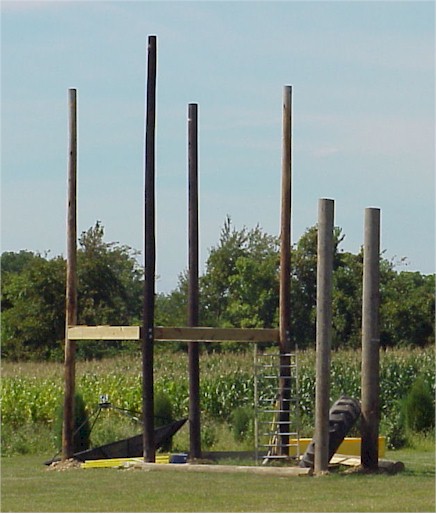
Thus, were the plans for a play tower for Erika conceived, and after many weeks of patient waiting, on July 19, the same utility company came out to perform the work, bringing with them no less than 7 poles in varying conditions. Five hours and a $150.00 donation later, four poles were set in a 10ft.-sided square. Two additional 20ft. pieces cut from one of the original 40ft. poles were placed near these as out riggers for the swings, and the utility pole itself, of course, was set by the barn as well (see the plan below for details). A 5ft. diameter tractor tire was found at a local tire wholesaler, and a 21ft. 3" steel pipe was ordered from a Cincinnati pipe supply firm, for use as the swing support.
August 1999
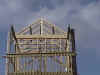
The first level beams and floor joists were installed on August 2nd.
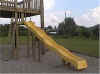
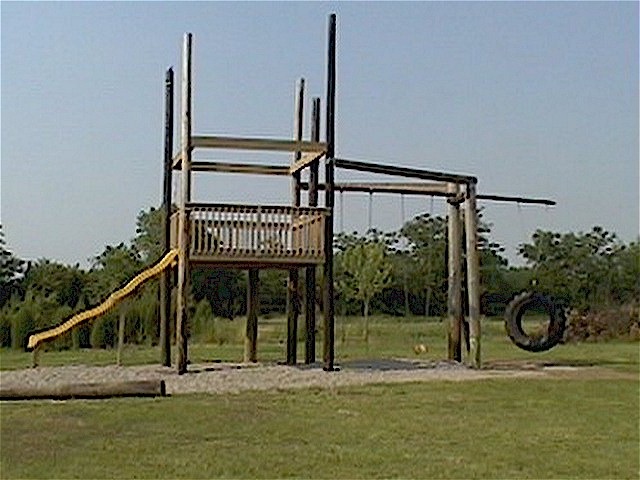
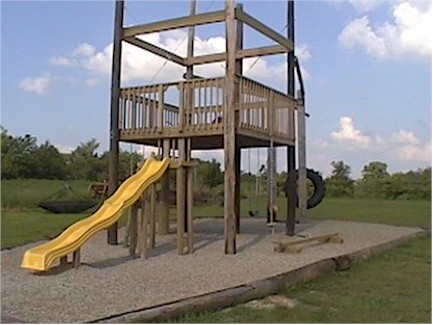
The first thumbnail image below shows the [current] plan (using MS PowerPoint) and the rest are images of the work in progress. The play tower will eventually consist of double decks, the lower level being an open affair, while the top level will have a 3ft. balcony and a regular "house" sort of enclosure. An unused 10ft. diameter satellite dish will be used to cap off the whole affair, with a dome sort of effect. Two 8ft. wave slide sections were purchased, and will be installed from the floor of the lower level deck to the ground. Additional effects will be added as they are devised.
The lower slide section will be supported by a suitably high pile of dirt that will be relocated from the remains of the excavation for the garage addition. This will enable the slide to extend the full length, while not appearing to be as high off the ground. .
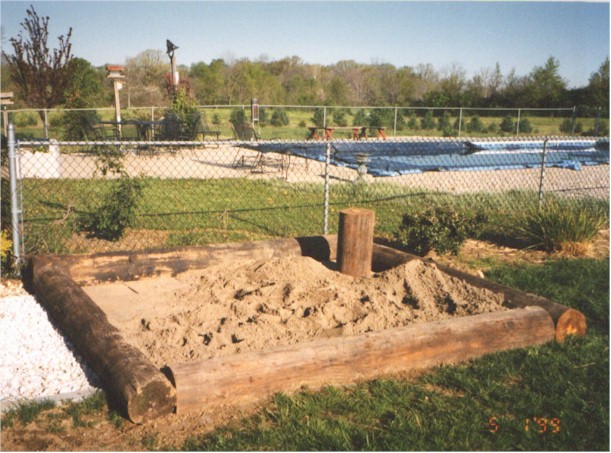
The other original 40ft. pole was cut into 4 9ft. sections and used to border a rather large sandbox. This is can be seen in ta thumbnail below as well.
September 1999
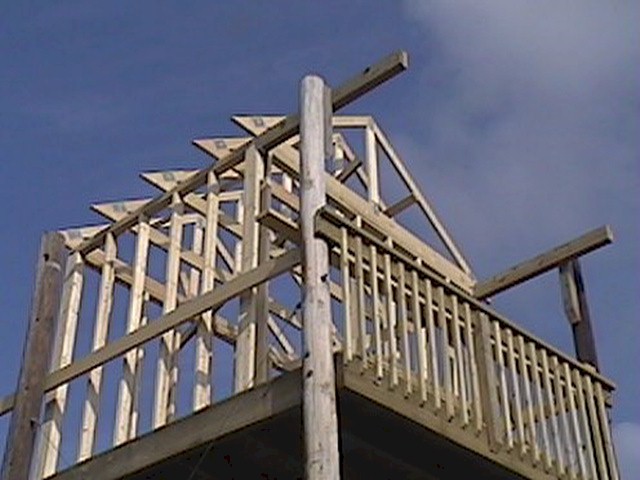
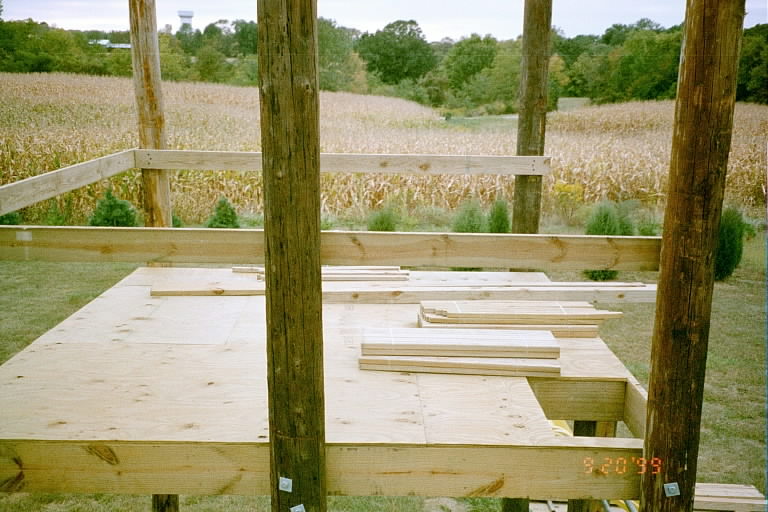
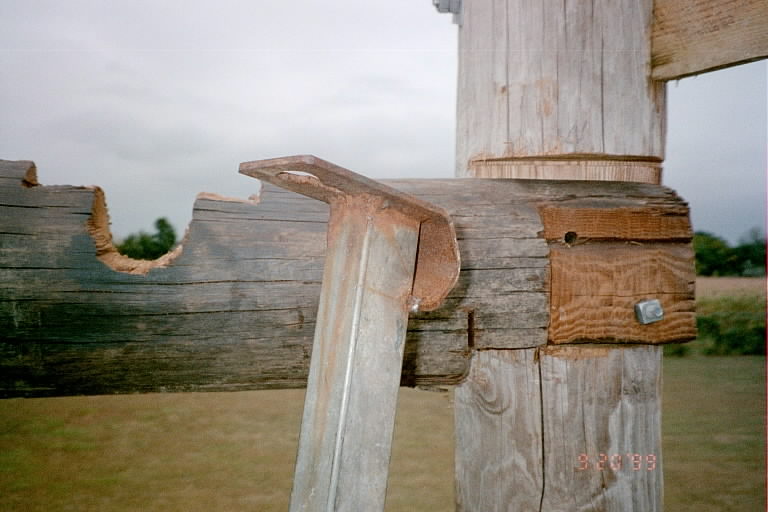
As the summer drew to a close, work was slowly progressing with the addition of the railing, the plywood floor, and the assembly of the beams and poles for the swing out-riggers. As of September 20, the top 2x6 rail was completed on the lower deck, and the beam (with an appropriately sized notch) to support the pipe for the swings was secured to the two out rigger poles. A 5"x8" 1/2" thick steel plate will be welded to the pipe and secured to the middle pole of the main structure to support the other end of the swing assembly. Views of these developments are now present below. To increase overall safety of maneuvering atop the poles, a tractor with a front end loader was placed into service (compliments of the James Renner family). This equipment has proven invaluable for operating the chain saw at the 15ft.+ heights required for this operation.
October 1999
Fall began with the rail being completed, and truss cabling installed on the west and east sides of the main deck. Photos of these are forthcoming. Due to the design, there was about 4"-6" of play in the structure when shaking it north to south. Due to the added support in the east-west direction of the outriggers, there is virtually no play in that direction. Adding the cabling (from the floor level of the deck diagonally to a point 9 ft. above the floor on the other side, has resulted in near total elimination of the tendency for such movement. The steel plate is ready to affix to the central east deck pole, and we now await the welding operation to complete the installation of the 3 and 1/2" o.d. pipe to support the swings.
Welding the pipe to the 1/2" thick plate was completed on Monday, October 18th. The tractor was again used to elevate the pipe to the supports. By the evening, a swing was attached, and Erika had managed to swing for the first time. She had no trouble swinging several feet above my head. Additional dirt was moved to the pile and measurements were made for the toe brace pipes. We await delivery of these (Sched. 40 Black Steel Pipes, 1 and 1/2" o.d.).
March 2000
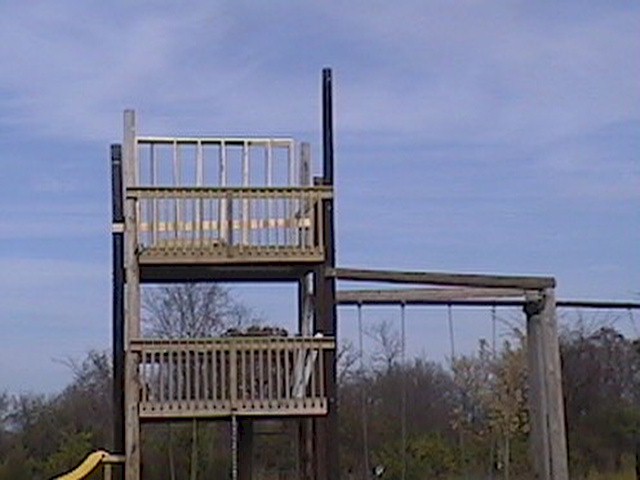
After a lengthy winter break, work commenced with the addition of the next wrap around for the second level. This was actually easier than installing the first level, since there was now a pre-existing 3ft. high railing to use to elevate the 2x10's. The tire swing has not yet been swung, since that will require cutting and welding of the 1-1/2" dia. steel pipes, which were purchased locally at a plumbing supply.
April 2000
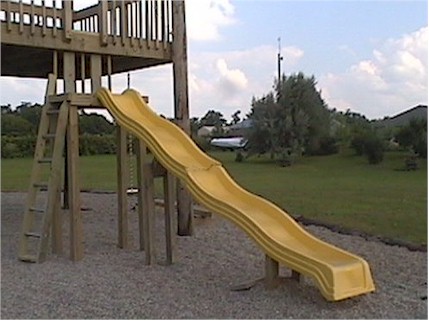
By the end of April, the two yellow plastic wave slides sections were spliced, and 4x4 post supports installed on the west side of the tower. Once it is determined that the wave nature of such a long slide length is practical, plastic bonding material will be used to seal, mold, and smooth the spliced joint. The pile of dirt seen in photo Deck and Railing Details below has been removed, since this it was necessary to fill tree holes left vacant in December and January from a significant tree exchange for moving project undertaken with the Back Tree and Landscaping Co., of Cincinnati.
We now await arrangements to haul wood chips from the same landscaping company to provide a safe medium underfoot. This area of chips will be surrounded by utility poles layed at the perimeter. Work on the 2nd level floor is scheduled for June.
May - July 2000
Scrap the chips idea. On the afternoon of May 26th, 15 tons of pea gravel was dumped at the base of the project. It has all be spread out, and we probably need a few more tons to completely do the job. The tire was installed on using cables and such on May 28, in time for a Memorial Day Party, without the supporting pipe bracing. The bow in the 3" pipe isn't too bad.... though we've imposed a weight restriction, until the toe brace can be installed.
The slide was also completed for the party, though the steepness coupled with the wave nature of the slide itself, causes a somewhat questionable sliding experience. The wave business may simply not be suitable for such a long slide. It gets to be a rather bumpy ride.
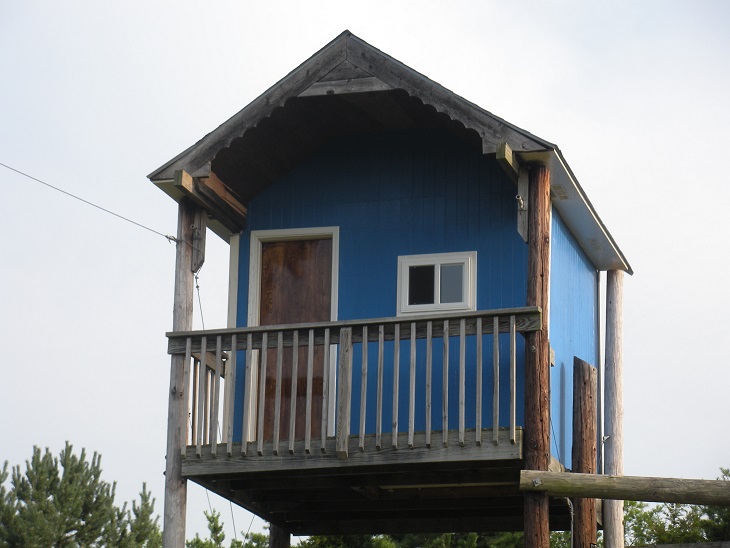
The dome for the roof has been re-thought. We will instead choose to build a standard peaked roof affair, in the Swiss style, perhaps, complete with a bit of an ovehang.
On June 28th, 14 more tons of pea gravel was delivered, and with the help of our neighbor, Marilyn Whelan and her skid steer, we managed to have it all leveled out by July 1, the date of a rather large outdoor party.
Also, by July 1, the gravel area was completely contained by utility poles laying on the ground. These were old ones provided by a neighbor who had no use for them.
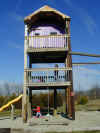
In mid-July, acrobat rings, a knotted rope, and a balancing beam were added. These effects resulted in a much higher degree of satisfaction from the primary beneficiary, Erika.
Also, given that the 9ft. height of deck 1 caused the slide affair to be impractically high and steep, a sub-deck was added that allowed the top of the slide to be at about 7ft. off the ground. This new arrangement resulted in a major improvement over the original design, and within a few days, Erika was confidently climbing up the ladder, as well as scaling the slide itself to reach the little deck. It has a back drop railing to prevent falling backwards off the deck Photos of the new slide, rings, rope, and balancing beam are provided below..
October - November 2000
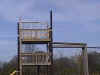
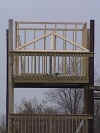
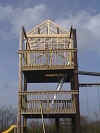
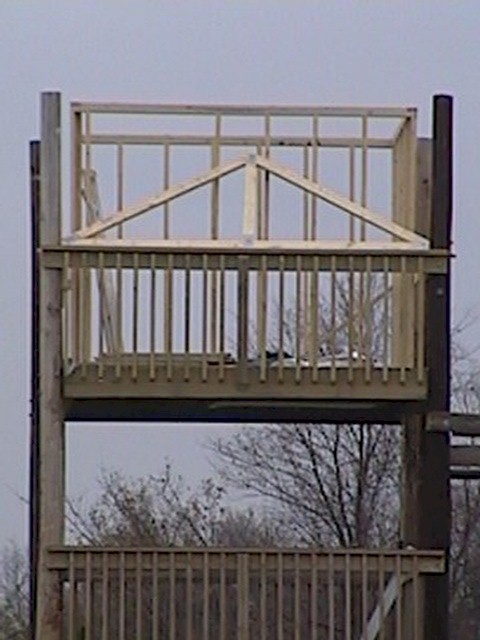
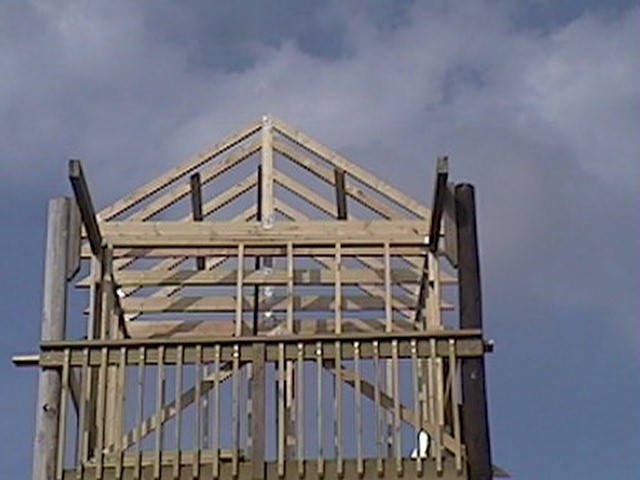
On October 24, purchases were begun for the 2nd level decking, railing, and "Haus" construction (framing, roofing, siding, etc.). See the table below for a status of ongoing expenditures. This acquisition ushered in flurry of construction activity: within days, the 5/4" decking and the front railing installed. Installation of the aluminum pull down attic ladder ensured safe and efficient access to the 2nd level. Wall framing construction followed, and by November 5, the four walls of the house were assembled. Trusses were built on November 4, and were attached to the walls on November 7th.
We decided to use trusses instead of simply installing roof beams to support rafters, because of concerns in ensuring a square rafter layout (the poles are not square to each other).
The front 4 ft. of the 2nd level deck will be a covered porch, with the roof extending out nearly 2ft. in front of the poles. In order to eliminate bottom truss interference, modified truss/rafters will be employed for the front most 3 roof rafters, supported by treated beam extensions from the front of the house frame (see photos below).
Temporary truss supports were installed since the next step (applying the OSB sheets and shingles) will possibly not commence until the Thanksgiving holiday.
Alas, the weather turned nasty. It was not until late Spring, 2001, that work would commence.
May - June, 2001
The weather was finally starting to cooperate. Since most materials were on hand, work could commence with short notice. On June 9th, my brother, Tom, came by, and having rented a 32ft. ladder, a 40ft. ladder, 2 ladder jacks, and 2 body harnesses, we proceeded to install the first run of sheathing on each side of the roof, 4ft up, 12 ft. from gable to gable.
Having started at 2pm or so, by 8pm, we had layed 4 courses of shingles on the West facing roof and rolled most of the felt paper on the East facing side. Minor design and technique changes continue to occur, however. Rather than using ladders to install the East roof, this work will be done from within the rafter structure itself, since the beams that support the swing extension to the East presented a major obstacle to setting up the ladders on that side.
Depending on our ability to work from 2x6 attachments on the E and W walls (as a pseudo scaffolding), we'll either contiue with shingles up the roof faces, to the ridge, or modify the plan somewhat, and use 8" wide Cedar siding boards for the final ridge gaps.
(As an aside, since July 2000, the Weather Station, (what started this whole project really) has not been operational. The reason for renting the 40ft. ladder was to try to get up high enough on the utility pole to retrieve the weather station. Unfortunately, in spite of being up high enough, I was unable to successfully dismantle the antenna mast. The weather station was subsequently removed from the pole with the help of a bucket truck, and installed on an antenna mast on the roof of the house, where it has remained for many years.)
July, 2001
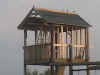
Work on the shingles progressed to the point of completion, by Saturday, July 14th. I was able to manage the cap operation, while straddling the ridge. Alan Jones, an office associate, came to help on July 13th. An outrigger of sorts was attached earlier in the month to permit access to the roof. This, along with a rope tied from top plate to top plate provided the safety necessary to accomodate working on the shingles. With this approach, shingles were used for the entire roof operation. On July 7th, most of the siding was cut; by July 9th, most was also finished with the Royal Plum exterior latex requested by Erika. Additionally, when the final rafter was installed on June 9th, it was unfortunately installed backwards -- the mending plates were exposed. To solve this problem, it was decided to add a fascia of cedar (1"x8") that would be cut with a scallop effect in the Swiss Chalet style. This was prepared and cut by July 26th. Soffit boards using 1"x12" pine boards were prepared (12ft ea) with 2 4"x16" vents.
Shutter style windows were installed, as well as a door for access to the porch area.
June, 2002
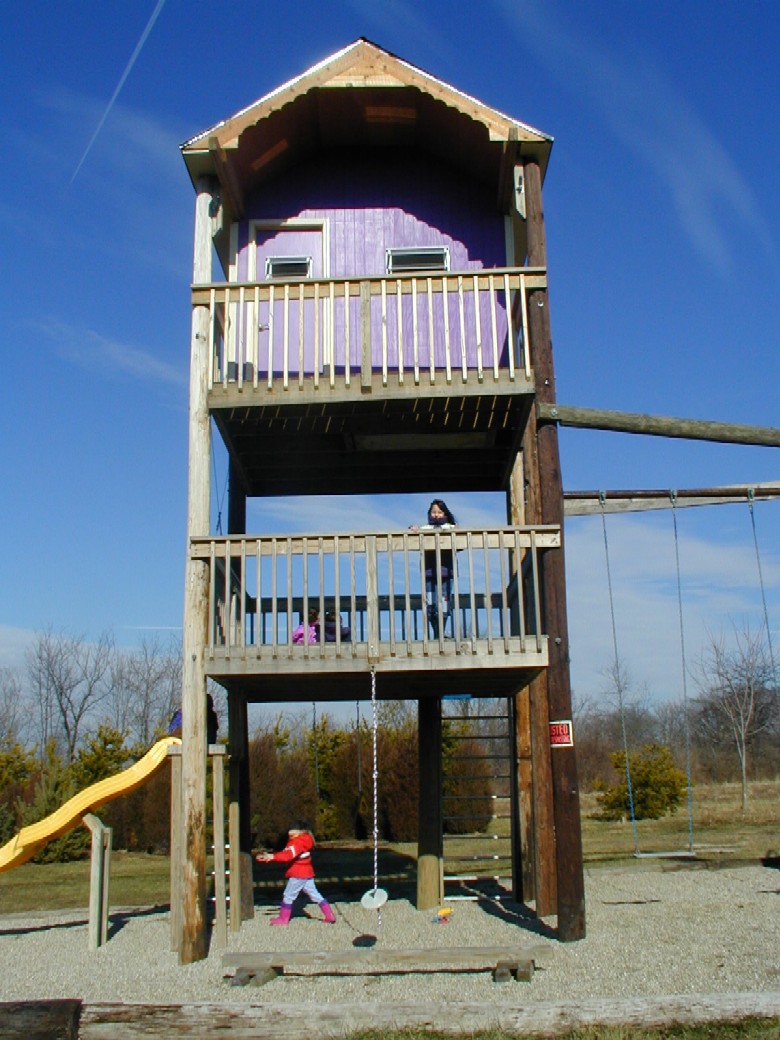
In order to complete the tower in time for Erika's 6th birthday party (June 25, 2002), I rushed to install the OSB boards for ceiling and walls, as well as the padding for the carpet, the carpet, and a rail for the entry steps. This was completed by early in the morning of the 25th. All was then completed. Later in the summer, Erika and I spent a night in the tower. A queen size air mattress fits nicely in the upper room. Total cost of the tower to date is $1,955.25 or so.
Installation of the Zipline - July 2010
In 2010, beginning in May, the idea to add a ZIP LINE from the tower was considered. The idea came from an associate at MQSoftware, a company I did business with at DLA, who had installed one in her back yard for her kids. I had toyed with the idea previously, but didn't think it was feasible -- until now. With the help of my brother and a mathematician at DLA, we designed the zip line to run from abt 23ft. off the ground from the porch of the tower, to a point 215ft due south, along the side of the house. Final speed was calculated to be 7.108383194 Ft/s.
The terminus was a massive laminated post, 16ft tall, made from 4 "6"x6" treated timbers. The post was installed with the assistance of a local crane operator, as we had no onsite prospects for how to elevate and deploy so heavy a beam. On August 1, 2010, Erika became the first person to test the zip line, following careful testing using a punching bag. All was well, and the rest is history.
August 2012
Erika, being a girl, was significantly unimpressed by the amount of flies, bugs, and other creatures that inhabited the tower. Plus, the carpet wasn't doing anything for her. So, it was ripped out, and 3 boxes of Lowes Luxury Vinyl Walnut Planking (adhesive strips) was requisitioned in order to redo the floor. This made things much more elegant. However, the bugs remained. Additionally, a list of "todo's" was created, including the replacement of the windows, adding electric, a new door, caulking, etc., to make the place more livable, in the opinion of the daughter. In 2012, 250ft. of all weather cable, and a fluorescent light for the wall was also procured. Two (2) tubs of textured paint for the walls were also purchased. However, other than the flooring, no further tower improvements were completed in 2012.
August 2013
At long last, the Phase 2 Tower Renovation project was underway. The walls were textured, to cover the red-neck OSB look of the interior. Taking advantage of my last "furlough day" from the Defense Logistics Agency, on August 12, a 3 board 7/8" thick oak panel door was built, to replace the original hollow door that had been attacked by squirrels several years earlier. It was installed on Friday, August 16, with the help of Dave Moravek. In the following weeks, trim was added for the four corners of the interior room, the walls and ceiling were painted, baseboard trim added. A new 18"x24" vinyl window was added as well. During the last week of August, the collapsible attic ladder was replaced with a trap door, to further seal the entrance way whether inhabited or not. And thus, by the beginning of September, there will be an "open tower" to present the renovated Spielturm for a limited world to see. An exhaust fan was purchased as well, to aid in ventilation.
Date Category Description Detail Qty Cost Each Extended Cost 7/20/1999 Poles Telephone Pole Installation 7 Poles Delivered and Installed n/a n/a $ 150.00 8/1//99 1st Floor 1st Floor Beams 2"x10"x12' 6 $ 19.99 $ 119.94 8/1/1999 1st Floor Joists 2"x10"x10' 5 $ 10.27 $ 51.35 10/1/1999 1st Floor Balisters 2"x2"x42" 72 $ 0.98 $ 70.56 10/1/1999 1st Floor Railing Posts 4"x4"x8' 3 $ 5.19 $ 15.57 10/1/1999 1st Railing 2"x6"x12' 4 $ 7.55 $ 30.20 8/1/1999 1st Floor Ladder Supports 2"x4"x8' 2 $ 3.45 $ 6.90 9/1/1999 Accessories Swing Support Pipe 21' x 3.5" Sched 40 1 n/c $ - 2/1/2000 Pipe Toe-brace Pipe (cut in half) 20' x 1.5" Sched 40 1 $ 16.00 $ 16.00 5/2/2000 Swing Hangers Hanger for 3.5" O.D. Pipe 2 $ 25.76 $ 51.52 10/1/1999 Pipe Hangers Galv. Pipe Hanger (no swivel) 3 $ 4.00 $ 12.00 9/2/1999 Residential Bucket Swing Seat Tan 1 $ 9.95 $ 9.95 9/2/1999 Residential 5-1/2" wide belt Seat Blue 1 $ 10.25 $ 10.25 9/2/1999 Polyethylene Handles Red 2 $ 6.65 $ 13.30 9/2/1999 Safety Chain 1 $ 5.26 $ 5.26 9/2/1999 Shipping/Tax 9/2/99 - Discount Fence Supply, Inc. 1 $ 9.66 $ 9.66 9/21/1999 Turnbuckles, Bolts, Cable - Lowes 1 $ 81.83 $ 81.83 9/16/1999 Bolts - Sears 1 $ 16.84 $ 16.84 9/21/1999 Bolts - Lowes 1 $ 9.07 $ 9.07 7/18/2000 Quick Links/Eye Bolts - WCLT 1 $ 14.31 $ 14.31 7/19/2000 Acrobat handles/bar + hardware 1 $ 14.93 $ 14.93 7/7/2000 Knotted Rope Swing + hardware 1 $ 21.87 $ 21.87 10/20/1999 Hardware - Lowes Bolt, links snaps 1 $ 38.06 $ 38.06 5/22/2000 Gravel Pea Gravel - Mecco 15.02 tons 15 $ 10.00 $ 158.46 6/26/2000 Pea Gravel - Mecco 14.75 tons 14.8 $ 10.25 $ 159.51 3/6/2000 2nd Floor 2nd Floor Beams Treated 2"x10"x12' 6 $ 14.39 $ 86.34 10/24/2000 2nd Floor Joists Treated 2"x8"x10' 5 $ 7.87 $ 39.35 10/24/2000 2nd Floor Balisters 2"x2"x42" 30 $ 0.90 $ 27.00 10/24/2000 2nd Floor Railing Treated 2"x6"x12' 2 $ 6.97 $ 13.94 9/1/2000 2nd Floor Railing Posts 4"x4"x8' 1 $ 5.19 $ 5.19 10/26/2000 2nd Floor Access Ladder Aluminum Attic Ladder 1 $ 88.00 $ 88.00 10/27/2000 2nd Floor Decking 5/4"x6"x8 1 $ 3.77 $ 3.77 10/24/2000 2nd Floor Decking 5/4"x6"x12 18 $ 5.97 $ 107.46 anita House House Framing Untreated 2"x4"x8' 17 $ - $ - 11/2/2000 House Framing Untreated 2"x4"x8' 20 $ 1.74 $ 34.80 10/24/2000 House Framing Treated 2"x4"x8' 7 $ 3.45 $ 24.15 11/2/2000 House Framing Untreated 2"x4"x10' 3 $ 2.38 $ 7.14 10/24/2000 House Framing Treated 2"x4"x10' 1 $ 4.50 $ 4.50 free Roof Beams Untreated 2"x6"x12' 5 $ - $ - 10/24/2000 Ceiling Rafter Untreated 2"x6"x12' 6 $ 4.97 $ 29.82 anita Roof Rafters 2"x4"x8' 14 $ - $ - 10/24/2000 Roofing Material (shingles, etc.) 3 in 1 5 $ 7.53 $ 37.65 10/27/2000 House Framing Treated 2"x6"x8' 1 $ 5.17 $ 5.17 11/2/2000 House Framing Treated 2"x6"x10' 2 $ 6.40 $ 12.80 10/27/2000 Roofing Sheathing (chipboard) 4'x8'x7/16" 8 $ 5.97 $ 47.76 11/2/2000 Ply Clips 1/2" 1 $ 2.27 $ 2.27 11/2/2000 Coated Sinker Nail 16d 1 $ 2.97 $ 2.97 10/27/2000 Joist Hangers 10 $ 0.44 $ 4.40 11/2/2000 Double Joist Hangers 2 $ 0.78 $ 1.56 10/24/2000 Siding T-11 4'x8'x3/8" 8 $ 16.94 $ 135.52 11/4/2000 Rafter Hardware and Hangers - Mending Plates 32 $ 0.52 $ 16.64 10/24/2000 Rafter Hardware and Hangers - Mending Plates 36 $ 0.26 $ 9.36 9/1/1999 Slide Wave Slide 4ft Yellow Wave Slides 2 $ 35.00 $ 70.00 9/1/1999 Slide Support Posts 4"x4"x8' 7 $ 5.19 $ 36.33 3/6/2000 Slide Decking Frame 2"x6"x8' 1 $ 7.12 $ 7.12 7/19/2000 Slide Ladder Supports 2"x4"x8' 2 $ 3.45 $ 6.90 8/23/2013 Door Ball Catch 1 $ 6.97 $ 6.97 Threshold 1 $ 7.99 $ 7.99 Hinges Brass 3 $ 2.25 $ 6.75 8/15/2013 Utility Handles Black 2 $ 4.59 $ 9.18 8/15/2013 Barrel Bolt 4" 1 $ 3.96 $ 3.96 Tack on Vinyl Insulation 1 $ 9.94 $ 9.94 Spade Bit Set 13/16" 1 $ 10.42 $ 10.42 8/15/2013 Trap Door Chest Handle 1 $ 4.59 $ 4.59 8/15/2013 Hook and Eye 1 $ 3.89 $ 3.89 8/13/2013 Electirc Nail on 1 Gang Box 1 $ 0.54 $ 0.54 8/13/2013 PVC Conduit 5' 1 $ 1.23 $ 1.23 PVC Conduit 10' 3 $ 1.43 $ 4.29 8/19/2013 Light Old Work Box 1 $ 2.06 $ 2.06 7/20/2012 Flourescent Light 12" 1 $ 6.98 $ 6.98 Flourescent Light 8" 1 $ 5.98 $ 5.98 Utilitech Fluorescent Light 13" 1 $ 21.82 $ 21.82 8/22/2013 Interior Renovation Ceiling Paint 1 $ 22.77 $ 22.77 Cove Trim 8ft. 4 $ 3.42 $ 13.68 8/23/2013 Oak Paneling 4x2' 1 $ 8.52 $ 8.52 8/13/2013 Oak Casing Molding 7ft 4 $ 7.49 $ 29.96 White Silicone 3 $ 5.21 $ 15.63 Clear Silicone 1 $ 5.67 $ 5.67 Foam Spray Insulation 1 $ 4.27 $ 4.27 8/13/2013 Oak Baseboard 8ft. 4 $ 8.82 $ 35.28 8/15/2013 Vinyl Window 18"x24" 1 $ 41.00 $ 41.00 7/1/2012 Walnut Vinyl Flooring 3 $ 29.40 $ 88.20 Total $ 2,326.82
Items included in the Renovation


Plan Tower Construction


Utility Tower 1-Wire Kit Sandbox
Installing Beams Decking Pipe Support and Beam Details

Deck and Railing Details Initial Play Equipment Phase
Pipe and Cabling Details Slide on Level 1 Deck - June 2000

Newly designed sub-deck View with rings and Alternate view with
July 2000 knotted rope w/seat balancing beam (right)
Framing the Walls Walls in place Neighbor Mark Deppe
Truss awaiting placement assisting with truss placement
Front View of Truss House Truss Assembly Side view of Porch Beams
Assembly Complete
With roofing in progress Completed View 1 of 2 Completed View 2 of 2
2013 Renovation 1 of 2 2013 Renovation 2 of 2
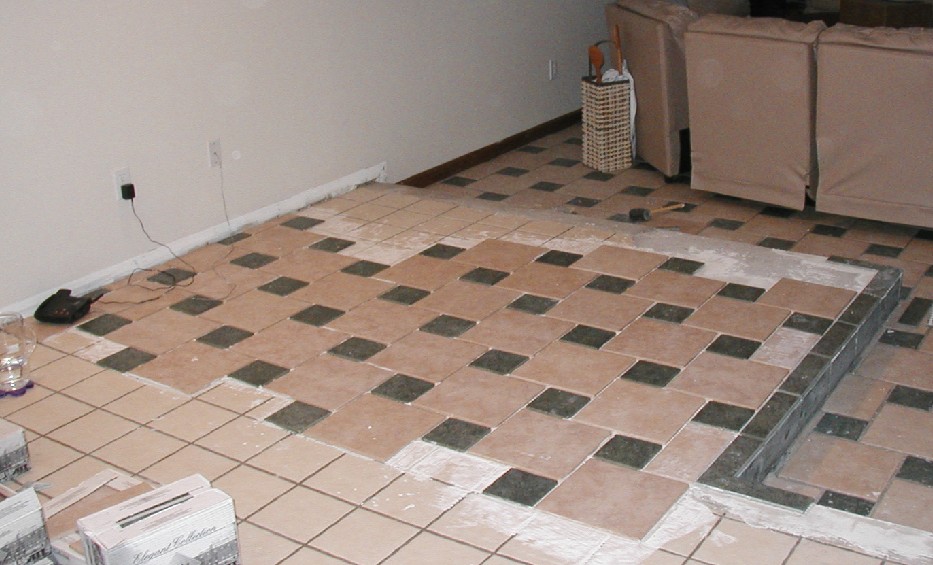
Ceramic Tile Installation in Great Room
In early February 2000, we removed the carpeting in the great room, and picked out a ceramic tile pattern to install. Rialto Beige and Green was used, from Lowes (manufactured by Del Conca, of Italy). The pattern we chose was:
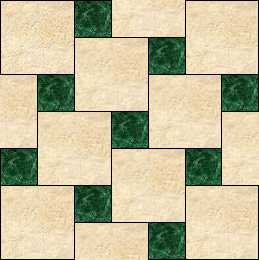
This is layed out square to the walls, but results in a diagonal in the pattern.
By the end of February, 2000, the tile was installed and sealed.
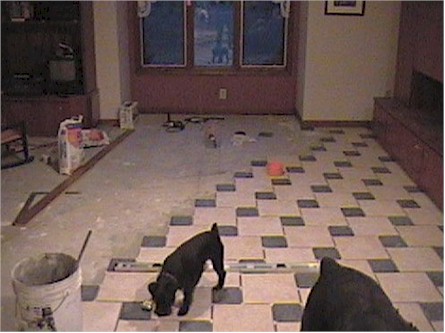
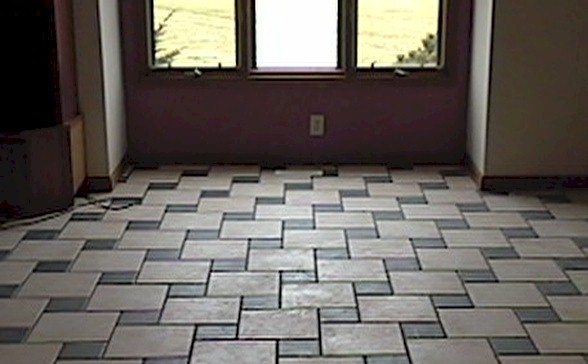
Under construction / pre-sealed photo
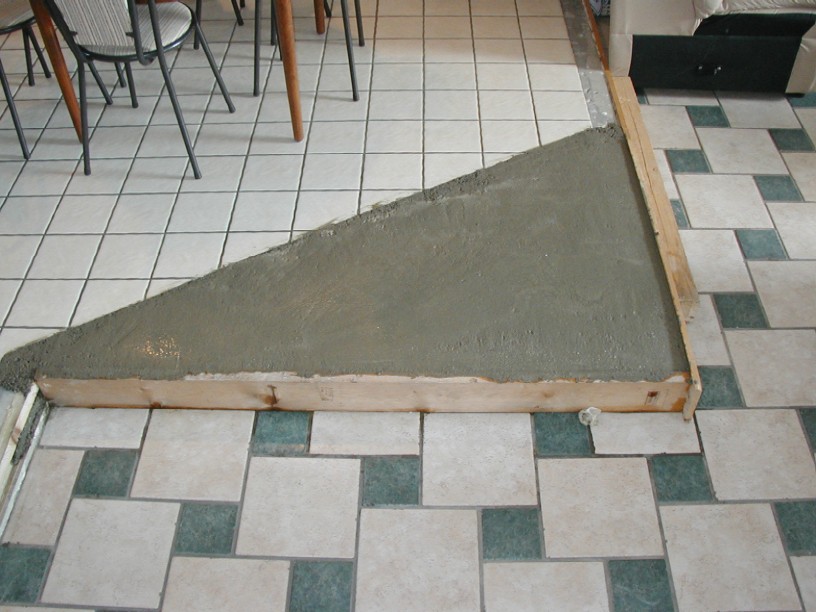
On November 10, 2002, preparations were made to continue this same tile theme onto existing tile in the kitchen and hallway. This began by pouring a concrete extension to the kitchen level as seen below.
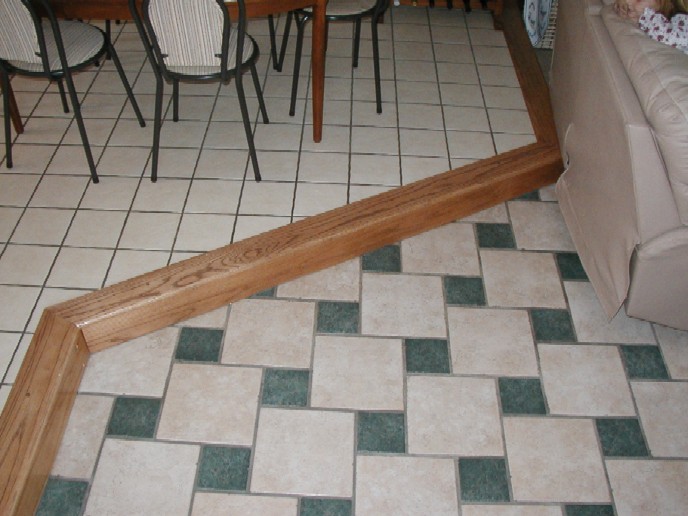
On November 25, tiling operations ensued for the foyer and kitchen. The 3 inch green trim was chosen as a somewhat economical alternative to other options investigated. The "cove" base was placed first, using cut 12x12 green tiles. On the 26th, the foyer went down and part of the kitchen; the underlying grout lines of the previous tile job are very accurate, so keeping things straight was remarkably easy.
The next series of photos detail the progress at present.
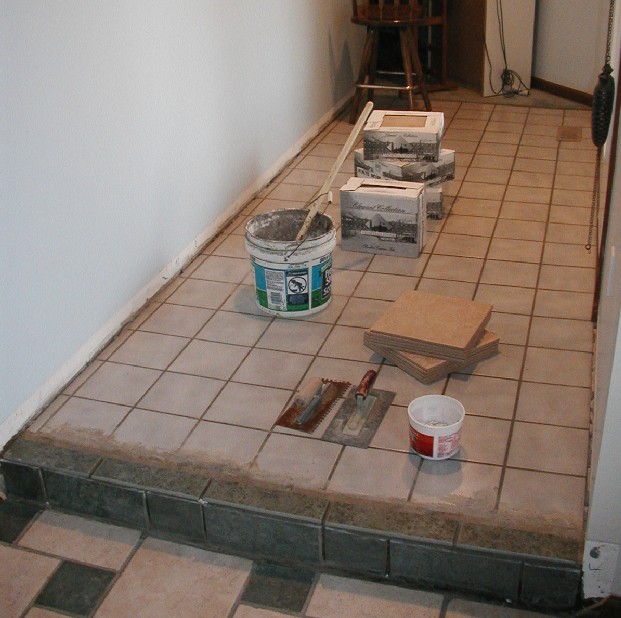


Foyer - 1 Foyer - 2 Foyer - 3 Kitchen - 1


